
MCPTotal's Network Layer: Visibility, Control and Private Network Access
Autonomous Security's Security Foundation
You've found this amazing MCP server that connects your AI assistant to Postgres. You install it on Autonomous Security, point it at your database, and suddenly Claude can query your data directly. Powerful stuff.
But here's the thing: that MCP server is now making network connections on your behalf. Where exactly is it calling? What data is it sending? If you're running it locally, you probably have no idea. And honestly? Neither did we—until we built the traffic layer.
Autonomous Security is a managed MCP hosting platform. We curate MCP servers from the community, run them securely in the cloud, and let users connect them to AI assistants like Claude, ChatGPT, and Cursor.
Security is foundational to what we do:
- AI-based curation analyzes every MCP before it enters our catalog
- API keys and credentials are stored in an encrypted vault (PCI-certified)
- Prompt injection guardrails protect against malicious data from MCP responses
- Sandboxed execution ensures each MCP runs in complete isolation
The sandbox is particularly important. Each MCP server runs in its own container with strict boundaries:
- No access to sensitive files or the host filesystem
- Complete isolation from other MCPs—they can't see or affect each other
- Network access limited to public internet only
This is a solid security posture. But we realized network access was still a blind spot.
MCPs could reach any host on the internet. We had no visibility into what they were actually calling. No way to enforce policies. And users who wanted to access private resources—a staging database, an internal API, a service behind IP whitelisting—simply couldn't.
We needed a traffic layer that would give us:
- Visibility: See every connection an MCP makes
- Control: Enforce policies on which hosts are allowed
- Private access: Let users route traffic to their own private resources
And it had to be hermetic—MCPs shouldn't be able to bypass it.
The Challenge: Why This Is Hard
The obvious approach is proxy environment variables. Set HTTP_PROXY and HTTPS_PROXY, and applications route traffic through your proxy. Simple, right?
We wish. In practice, it's a mess:
| Problem | Reality |
|---|---|
| Library support | Many libraries ignore proxy env vars entirely. Some crash on socks5:// URLs. |
| Inconsistent behavior | Some apps honor them, others don't. You can't be sure. |
| DNS bypasses the proxy | DNS queries go directly to the resolver—you never see them. |
| Not hermetic | A misconfigured or malicious MCP could simply ignore the env vars. |
We tried everything. We wrapped commands with proxychains4—a tool that intercepts network calls and routes them through a proxy. Some MCPs worked. Others crashed or bypassed it entirely. We tried standard proxy environment variables (http_proxy, https_proxy, all_proxy) pointing to a SOCKS5 proxy. We discovered Node.js needed a special flag (NODE_USE_ENV_PROXY) just to honor them. We added no_proxy exceptions. Still inconsistent—some MCPs respected the settings, others ignored them completely. We researched and tested other approaches. Same story.
For a security layer, "mostly works" isn't good enough. We needed to intercept all traffic—TCP, UDP, DNS—at a level where MCPs have no choice in the matter.
The Solution: Kernel-Level Interception
Here's where it gets interesting. Linux provides exactly what we needed: TPROXY (transparent proxy) via nftables.
TPROXY operates at the kernel level. When a packet leaves a container, nftables intercepts it before it reaches the network. The application has no idea this is happening—it just sees a normal connection. But we see all traffic now. (And yes, HTTPS, if used, encrypts everything, we'll touch this later).
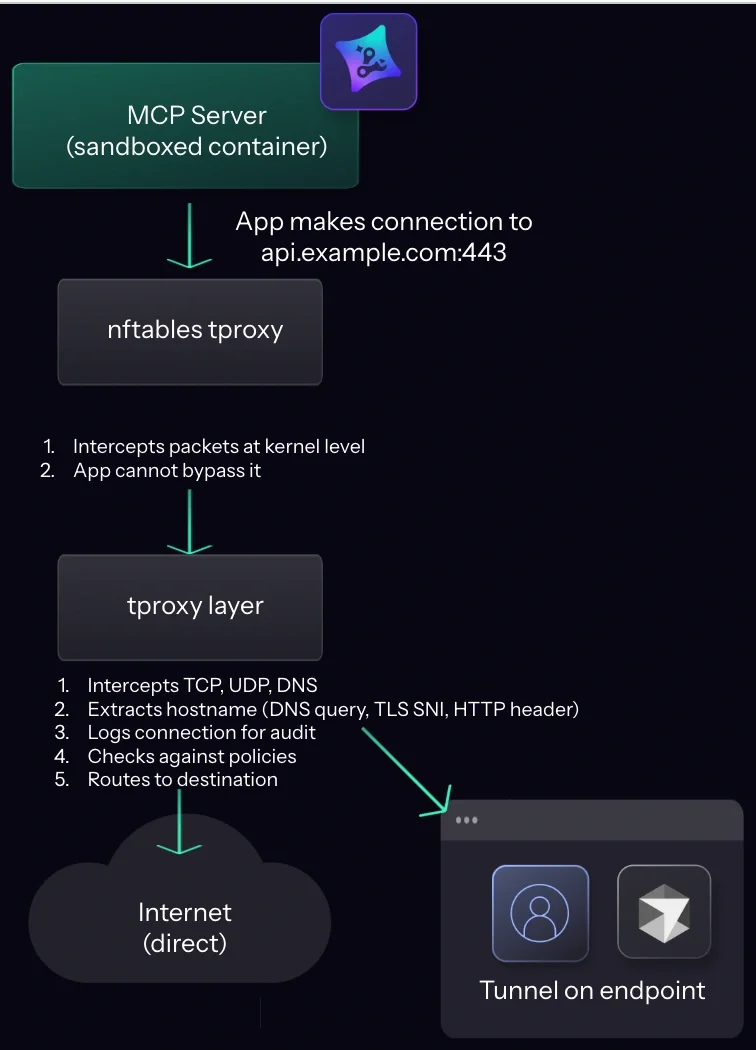
This is hermetic. The MCP server cannot:
- Bypass the interception (it happens at kernel level)
- Hide the destination (we extract it from DNS, TLS SNI, or HTTP headers)
- Avoid being logged (every connection is recorded)
Why We Built Our Own
We looked for existing TPROXY implementations we could use. The requirements seemed simple: intercept TCP and UDP, forward traffic, support both IPv4 and IPv6. But we also needed to identify which MCP made each connection—and that meant knowing the source IP of each packet to map it back to a container.
Most existing solutions either didn't expose source IPs, weren't actively maintained, or required more complexity than we wanted to take on. So we wrote our own in Go—a few hundred lines that gave us exactly what we needed: full protocol support (TCP, UDP, DNS), source IP tracking, and clean integration with our connector.
DNS: The Tricky Part
Here's a subtlety we didn't anticipate: DNS.
When you want to reach staging-db.internal.example.com, someone needs to resolve that hostname. Public DNS servers don't know about your internal domains—only your corporate DNS does. And that DNS is on your machine, behind your VPN, not accessible from our cloud.
So when an MCP container makes a DNS query, we can't just forward it to the container's default resolver. We need to route it to the tunnel client and resolve it there, using the user's local DNS.
Our solution: detect the container's DNS server at startup (from /etc/resolv.conf). When we see a DNS query targeting that internal resolver, we send a special frame to the tunnel client that says "use your local DNS." The query gets resolved on the user's machine—which means internal domains, split-horizon DNS, and VPN-only hostnames all just work.
DNS queries to explicit servers (like 8.8.8.8) pass through unchanged.
What the TPROXY Layer Sees
When traffic passes through our TPROXY layer, we extract rich metadata:
DNS queries: We see every hostname the MCP tries to resolve, along with the query type (A, AAAA, CNAME, etc.).
TLS connections: We parse the TLS ClientHello to extract the SNI (Server Name Indication)—the hostname the client is connecting to—without breaking encryption.
HTTP connections: For plaintext HTTP, we extract the Host header.
IP correlation: When a connection goes to an IP address, we correlate it with recent DNS responses to determine the original hostname.
This gives us complete visibility:
{
  "event": "network-connect",
  "app": "postgres-mcp",
  "details": {
    "hostname": "staging-db.internal.example.com",
    "dest_ip": "10.0.1.50",
    "dest_port": 5432,
    "protocol": "tcp",
    "route": "tunnel"
  }
}
We know which MCP made the connection, where it went, and how it was routed.
Why this matters: Imagine you install a Postgres MCP to query your analytics database. A week later, you check the traffic logs and see it's been connecting to api.stripe.com:443. That's... unexpected. Maybe there's a dependency you didn't know about. Maybe it's telemetry. Maybe it's something worse. The point is: now you can see it, investigate it, and decide whether to block it. Before the traffic layer, you'd never know.
Private Resource Access
Visibility and control are valuable. But we kept hearing the same question from users: "Can my MCPs access my internal systems?"
Think about it—many users have valuable data that MCPs could work with:
- A staging or production database
- Internal APIs and microservices
- Services running on localhost during development
- Resources protected by IP whitelisting
These aren't accessible from the public internet—that's the point. But with our traffic layer in place, we can route connections through a tunnel to the user's machine.
Here's how it works:
- User enables tunnel mode for their space
- User runs our CLI on their machine:
npx @mcp-total/mcpt --tunnel - The CLI establishes a secure WebSocket connection to our connector
- When an MCP makes a connection, our TPROXY layer routes it through the tunnel
- The connection exits from the user's machine and reaches the private resource

From the private resource's perspective, the connection comes from the user's machine. IP whitelisting works. Internal DNS resolves. VPC peering isn't needed.
The user stays in control:
- They choose when to run the tunnel client
- They can see what connections are being made
- They can revoke access by stopping the client
The CLI: Simple by Design
Users who want tunnel access are often running the CLI on a machine that already has the network access they need—their laptop on the corporate VPN, a dev machine inside the private network.
So we bundled everything together. Our CLI combines the MCP stdio proxy with our tunnel client in a single command. For Claude Desktop:
{
  "mcpServers": {
    "my-space": {
      "command": "npx",
      "args": ["@mcp-total/mcpt", "--mcp", "--tunnel", "<https://mcp.mcptotal.io/mcp-xxx>"]
    }
  }
}
One process. Authenticate once. Your cloud-hosted MCPs can now access your staging database, internal APIs, or any resource your machine can reach.
What's Next
The traffic layer is live today. Visibility, tunnel support, and an audit dashboard showing which hosts your MCPs access—all available now.
But we're not done. Seeing traffic is step one—acting on it is step two. Here's what's coming:
- Policy engine: Block that suspicious
api.stripe.comcall from your Postgres MCP. Allow only the hosts you expect. Set rules per-MCP or per-space. - Alerts: Get a Slack notification when an MCP connects to a host it's never contacted before. Catch anomalies before they become incidents.
- Deep traffic inspection: SSL termination to see not just where MCPs connect, but what they're sending. Full visibility into request and response payloads.
Wrapping Up
Let's recap where we started: Autonomous Security already ran MCPs in a secure sandbox—isolated, no filesystem access, no effect on other MCPs. But network access was still a blind spot.
Our traffic layer closes that gap:
- Visibility: Every connection is logged with full metadata
- Control: Policies can allow or block specific hosts
- Private access: Users can route traffic to their own private resources
And it's hermetic. Built on kernel-level TPROXY, MCPs cannot bypass it. They don't even know it's there.
This is what secure managed MCP hosting should look like: curated servers, sandboxed execution, encrypted credentials, prompt injection guardrails, and now—complete network visibility and control.
Want to see what your MCPs are actually doing on the network? Try MCPTotal—the tunnel feature is available now.